Transcribe MP4 to Text: A Practical Guide for 2026
Why can the same MP4 produce a readable transcript in one workflow and missing words, mixed-up speakers, and unusable captions in another? The file extension doesn't tell you whether the speech is clear, the right audio track was selected, or the timestamps survived processing.
To transcribe MP4 to text reliably, treat audio preparation, recognition, and transcript verification as separate jobs. Choosing a capable recognizer matters, but it won't fix a silent channel, recover an interrupted sentence, or prove who said something.
Table of Contents
- Choose Local or Cloud Mode for Your Recording
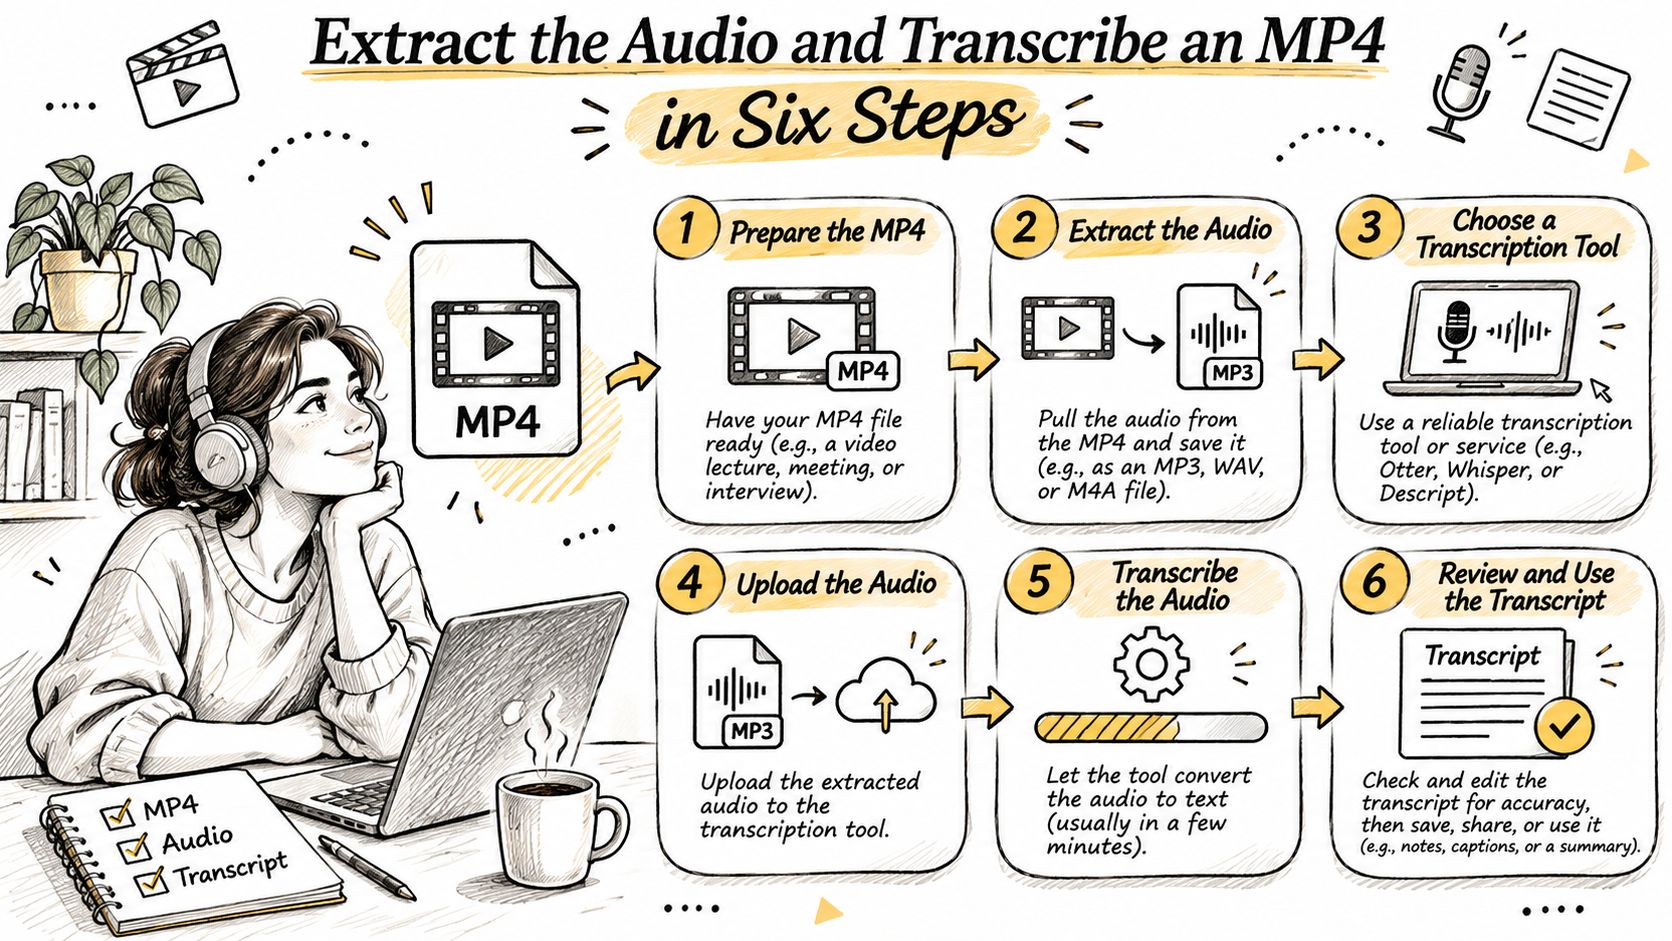
- Extract the Audio and Transcribe an MP4 in Six Steps
- Fix the Most Common Accuracy Problems
- Keep Timestamps and Speaker Labels Accurate
- Transcribe Your First MP4 Today
Choose Local or Cloud Mode for Your Recording
Choose where the recording will be processed before importing it. For sensitive material, that decision matters more than whether the first draft arrives neatly formatted.
Local Mode versus Cloud Mode for MP4 transcription
| Factor | Local Mode | Cloud Mode |
|---|---|---|
| Where transcription runs | On the Mac, on-device | Cloud service |
| Internet connection needed | No | Yes |
| Audio leaves the Mac | No | Yes |
| AI cleanup and formatting | Not included | Included |
| Filler-word and self-correction handling | Review and edit manually | Included |
| Best fit | Sensitive or offline recordings | Polished output for longer documents |
AIDictation's Local Mode runs on an Apple Silicon Mac and keeps sensitive audio on the machine. Cloud Mode sends audio to a cloud service and adds cleanup, context-aware formatting, filler-word removal, and handling of self-corrections. The local versus cloud processing guide explains the processing distinction; if you're also deciding where finished notes belong, the Creators Toolbox note app comparison is useful for evaluating the broader note-taking workflow.
Privacy requires a retention decision
We limit access to audio and transcript data to what's needed to provide the requested feature. That's a policy statement, not permission to upload a confidential interview. Auto Mode can switch between on-device and cloud recognition, so select Local Mode explicitly when the recording must stay on the Mac.
For clinical recordings, removing names doesn't necessarily remove the privacy risk. An AMA Journal of Ethics analysis explains that identifiable voices can remain re-identifiable and describes the trade-off between deleting recordings and retaining them to verify transcription errors.
Privacy rule: Decide who can review the recording, how long they can retain it, and who confirms deletion before processing begins.
Local processing doesn't settle recording consent, access permissions, or clinical record-retention obligations. Keep a record of consent, restrict access, validate consequential passages, and document deletion when the approved retention period ends.
This video offers an additional walkthrough of the workflow.
A journalist working with a confidential source on a plane needs offline processing, not automated polishing. A product manager preparing an approved internal planning call for circulation may value cleanup more, provided company policy permits cloud processing.
Before importing either recording:
- Confirm consent: Establish that recording and transcription are permitted.
- Set the mode: Make the processing location an explicit choice.
- Schedule deletion: After verification, delete working audio copies when retention rules permit.
Extract the Audio and Transcribe an MP4 in Six Steps
An MP4 is a container, not a transcription format. As the MP4 format overview explains, it can hold video, audio, subtitles, and other timed data. A transcriber must locate the intended audio stream and decode it before recognizing speech.
Consider a hypothetical interview recorded during a video call. The MP4 contains screen video and stereo audio, but the interviewer may be clearer on one channel while the guest is clearer on the other. Converting that recording without listening first can bury useful speech or discard information that would help identify speakers.
The processing pipeline is straightforward: read the file, decode the audio, segment the speech, run recognition, and attach timestamps. The complications come from the recording itself, including codec compatibility, noise, accents, overlapping voices, and terminology.
Use this workflow to separate those problems instead of changing tools at random.
Inspect and prepare the source
-
Confirm the intended audio track.
Open the file in a media inspector such as MediaInfo, or inspect its streams with FFprobe. Note the duration, channel count, sample rate, and whether the container holds multiple audio streams. Then listen to an opening passage, a speaker exchange, and a section from later in the recording.
Don't rely on the presence of an audio stream alone. A screen recording can contain an audio track that's silent, while another stream contains the actual conversation. Check that both sides of the interview are audible before starting a long transcription job.
-
Decode to a suitable working format.
For a recognizer expecting speech-band input, a practical target is mono, 16-bit PCM WAV at 16 kHz, consistent with the preparation guidance associated with the NIST OpenASR evaluation plan. Use an audio editor such as Audacity or a controlled FFmpeg conversion, and leave the original MP4 untouched.
Inspect the channels before mixing them. If one channel is silent, select the channel containing speech rather than averaging speech with silence. If the channels isolate different participants, preserve separate working copies so you don't throw away useful speaker information.
Conversion improves compatibility, not the original recording. A WAV file won't restore syllables that were clipped or lost before you received the MP4. Apply noise reduction cautiously and compare the result with the untouched audio; an apparently cleaner recording isn't useful if consonants become harder to distinguish.
-
Record the extraction settings.
Give the working file a descriptive name containing the recording date, source, and processing state. Keep a short processing note alongside it: selected stream, channel treatment, output format, sample rate, and any cleanup applied.
This is how you distinguish a reproducible result from a lucky export. Avoid names such as final-new-fixed, which don't tell a colleague which source or settings produced the transcript. When you change a setting, create a new working version instead of overwriting the only copy.
Process and verify the result
-
Segment long recordings without cutting away context.
Use bounded segments with a short overlap when your workflow requires chunking. Prefer pauses or natural topic changes over arbitrary cuts through a sentence, and record each segment's starting position in the original recording.
Merge using timestamps, not by pasting transcript paragraphs together. The overlap can produce duplicate words, so compare the shared passage and retain one verified version. Keep the segment offset attached to its timestamps; otherwise, every segment may appear to begin at the start of the video.
Keep enough shared audio to recognize the join, then remove duplicate text deliberately. Don't ask a text editor to infer where the conversation continued.
-
Load the working file with the processing mode already selected.
Open the transcription interface, confirm the chosen mode, and load the supported audio or video file. Set the spoken language explicitly when you know it, and prepare a vocabulary list containing participant names, product names, acronyms, and specialized terms.
Direct MP4 import can be convenient when the tool handles extraction correctly. A separate audio export is valuable when you need to select a stream, repair channel handling, or reproduce the preprocessing. Don't convert because the filename ends in MP4.
-
Check playback alignment before exporting.
Compare the transcript with the video at the opening, around segment joins, and near the end. Listen for omitted phrases and check that the displayed timestamps locate the same words in the original recording.
Export plain text when the destination is a document, and a timestamped caption format when the destination requires synchronized subtitles. If the transcription interface doesn't provide the required caption export, use an editor that preserves timing rather than manually inserting guessed timecodes.
A usable first pass has readable sentences, recognizable speaker turns, and no obvious missing passages. It's ready for targeted review, not automatic publication.
Fix the Most Common Accuracy Problems
A 5% word error rate roughly means five incorrectly handled words per hundred reference words, while 25% means about one word in four, as explained in the ACM speech-recognition evaluation synthesis. Those are very different editing workloads, even when both transcripts look neatly punctuated.
Word Error Rate, or WER, counts substitutions, deletions, and insertions against a reference transcript. It doesn't tell you whether an error changes a clinical instruction, reverses a decision, or misspells an unimportant connecting word. Judge the transcript by both recognition quality and the consequences of getting particular words wrong.
Transcript symptoms, likely causes and fixes
| Symptom | Likely cause | Fix |
|---|---|---|
| Many misheard words | Background noise or poor source audio | Re-extract the intended channel in the recognizer's speech format, then rerun |
| Names and jargon wrong | Terms missing from the vocabulary | Add names and technical terms to the custom dictionary |
| Words missing at segment edges | Hard cuts between chunks | Use a short overlap and merge by timestamp |
| Speakers swapped | Crosstalk or similar voices | Re-check speaker turns against the audio |
| Numbers or codes wrong | Digits misrecognized | Review every numeral in a sampled section |
| Text drifts from the video | Timestamps lost in merge | Check the opening and closing audio of each segment |
Fix the cause before polishing sentences
Start with the simplest explanation. If only the guest's words are poor, inspect that channel and its volume before changing recognition engines. If ordinary speech is readable but component names are wrong, work on vocabulary rather than applying more noise reduction.
Don't treat a re-export as a universal repair. When the source contains distortion, distant speech, or overlapping voices, changing the working format won't recreate the missing information. Use the transcription editing workflow to separate corrections to wording from changes to punctuation and readability.
Build your review sample around difficult passages, not just the clearest introduction. Include noisy sections, speaker changes, acronyms, numerals, and segment boundaries, then compare each passage directly with the audio.
A fluent sentence can still contain the wrong dose, date, identifier, or decision. Readability is not verification.
If errors cluster around a particular speaker or recording condition, expand the review to similar passages. For consequential clinical, legal, or technical material, sampling alone isn't enough to approve every critical statement.
Keep Timestamps and Speaker Labels Accurate
A transcript can contain the right words under the wrong person's name. It can also reproduce the conversation accurately while placing captions too early or too late. Recognition, speaker attribution, and synchronization are separate checks.
The AudioBench paper identifies accent as an overlooked dimension in earlier evaluations. That matters when selecting a tool for actual participants rather than relying on an average benchmark score.
Establish identities before editing dialogue
Consider a hypothetical panel discussion with a moderator and several guests. A brief interruption, laughter, or a voice heard through a room microphone can produce an incorrect speaker boundary. Don't use accent, job title, or the apparent meaning of a sentence as proof of identity.
Use this checking routine:
- Map voices early: Label the opening exchanges manually and confirm each speaker against the audio or visible video. Editing labels won't necessarily retrain the recognizer, so inspect later turns too.
- Check handoffs: Listen closely when someone interrupts, answers briefly, or resumes after another person speaks.
- Test distant anchors: Compare a distinctive phrase near the beginning with phrases farther into the recording. Check both sides of every edit or segment join.
- Mark uncertainty: Use brackets such as [unclear name] or [overlapping speech] rather than filling gaps with plausible wording.
For captions, preview the text during playback. A correct timestamp attached to an overlong caption can still create an awkward viewing experience; the video caption generation guide helps distinguish transcript editing from caption preparation.
Test what the audience needs
Before processing the whole file, choose a representative test clip containing an accented passage, overlapping speech, names, a technical term or code snippet, and background noise. Add known terminology to the custom dictionary, but verify the output against what was spoken.
The best result for a meeting isn't necessarily the smoothest paragraph. Readers need to know who committed to what, where they can find the statement, and which words remain uncertain.
Start with the difficult exchange where a guest interrupts the moderator and names a component, medication, or project. That clip will reveal more about practical usability than a clean prepared introduction.
Transcribe Your First MP4 Today
Take the test clip containing that difficult exchange and create a working audio file using the settings you recorded during extraction. Run it in the processing mode you've approved, then review it while listening, before spending time on the complete recording.
Don't polish the draft immediately. First establish whether the recognizer captured the content, preserved the speaker changes, and returned usable timing. Grammar corrections can make an incomplete transcript harder to spot because the editor may turn broken recognition into convincing prose.
Make a clear acceptance decision
Use a short acceptance checklist rather than deciding that the transcript looks good:
- Content: Are names, technical terms, negations, and quantities faithful to the recording?
- Attribution: Can a reader identify who asked, answered, agreed, or objected?
- Timing: Can you locate the corresponding passage in the original video?
- Uncertainty: Are unresolved words visible rather than guessed?
If the clip passes, process the complete recording and inspect the difficult passages and joins. If it fails, change one thing at a time: correct the vocabulary, select a better source channel, adjust preprocessing, or try a different recognition mode where policy permits.
Keep a brief note of what changed and whether it helped. Otherwise, it's easy to repeat an unsuccessful cleanup operation or choose a version because its sentences sound more polished, not because they're more faithful.
Acceptance standard: Approve the transcript for its intended use, not for how little editing it appears to need.
Keep a reproducible record
For recordings you're authorized to retain, store the original MP4, extraction settings, and verified transcript together in an access-controlled location. Include any speaker mapping and unresolved passages so another reviewer can continue without guessing.
For confidential material, follow the approved retention schedule instead of keeping everything indefinitely. A reproducible workflow needs documented decisions and controlled source access, not an unmanaged folder of permanent audio copies.
AIDictation offers a free audio-to-text tool for trying the workflow, while Pro includes audio and video file transcription and translation to English when requested. Visit AIDictation, start with a representative MP4 test clip, and verify the result against the audio before processing the full recording.
Frequently Asked Questions
What does Transcribe MP4 to Text: A Practical Guide for 2026 cover?
Why can the same MP4 produce a readable transcript in one workflow and missing words, mixed-up speakers, and unusable captions in another? The file extension doesn't tell you whether the speech is clear, the right audio track was selected, or the timestamps survived processing.
Who should read Transcribe MP4 to Text: A Practical Guide for 2026?
Transcribe MP4 to Text: A Practical Guide for 2026 is most useful for readers who want clear, practical guidance and a faster path to the main takeaways without guessing what matters most.
What are the main takeaways from Transcribe MP4 to Text: A Practical Guide for 2026?
Key topics include Table of Contents, Choose Local or Cloud Mode for Your Recording, Privacy requires a retention decision.
Ready to try AI Dictation?
Experience fast voice-to-text on your device. Free to download.
Download FreeRelated Posts
Audio Transcription App Free Guide for 2026
An audio transcription app free comparison for 2026: limits, privacy, offline use, accuracy tests, and which tier fits your work.
Don't Type: How to Start Dictating Step by Step
Don't Type anymore: learn mic setup, voice training, punctuation commands, common fixes, and private dictation options that can keep your text on your device.
10 Best Ways to Transcribe Audio to Text Free in 2026
Compare 10 free ways to transcribe audio to text free, with privacy, accuracy, and limit trade-offs for each option in 2026.