Background Noise Reduction for Cleaner Dictation on Mac
You know the moment. You start dictating a long email on your Mac in a café, on a train, or beside an open window, and the transcript looks fine at first glance, then every few words a sentence bends sideways. A coffee grinder takes over a noun. A passing voice eats a command. By the time you skim the result, you're not editing, you're reconstructing.
That's why background noise reduction matters for dictation. It isn't about making audio prettier, it's about protecting the words that speech software has to catch before they disappear into room noise, HVAC hum, keyboard bursts, or other voices. On a Mac, that protection comes from a chain, not a switch, and each link can help or hurt the transcript.
Table of Contents
- Why Background Noise Reduction Matters for Dictation
- The Three Layers of Noise Reduction Explained
- Key Metrics That Decide Whether Cleanup Helps or Hurts
- When More Suppression Actually Makes Things Worse
- Choosing a Microphone and Setting Up Your Mac
- Tuning AIDictation Modes for Noisy Environments
- A Repeatable Test for Your Own Setup
- Putting It All Together for Cleaner Dictation
Why Background Noise Reduction Matters for Dictation
You finish dictating a stakeholder update, press stop, and the transcript swaps “timeline” for “time line,” drops a product name, and turns a clean sentence into a mess that needs hand repair. That kind of failure feels random, but it usually isn't. The input was already fighting the room, and the noise won.
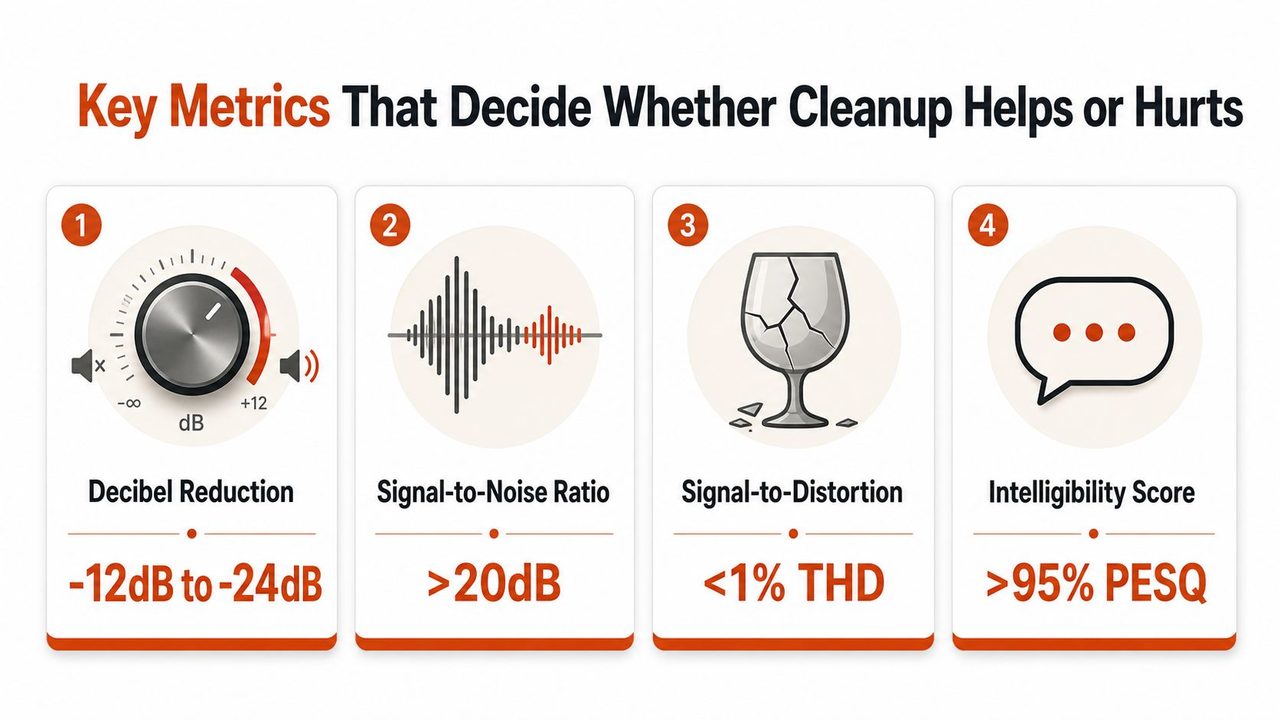
Speech systems are sensitive to the ratio between the voice you want and the sound you don't. In acoustics, background noise is often assessed with level-based measures, and a common validity rule is that unwanted noise should sit at least 10 dB below the source you're measuring to avoid significant error, while clear speech often needs an SNR above about 15 to 20 dB to stay intelligible in practice, according to acoustic guidance from Svantek's background noise overview, which also notes that exposure to 95 dBA can significantly reduce mental workload and visual or auditory attention, with P < 0.05 (Svantek background noise guide). Those numbers matter because dictation tools aren't only cleaning sound, they're trying to preserve the speech cues that let a model tell “project launch” from “project lunch.”
Practical rule: if a room sounds “a little busy” to you, it can still be too noisy for accurate dictation.
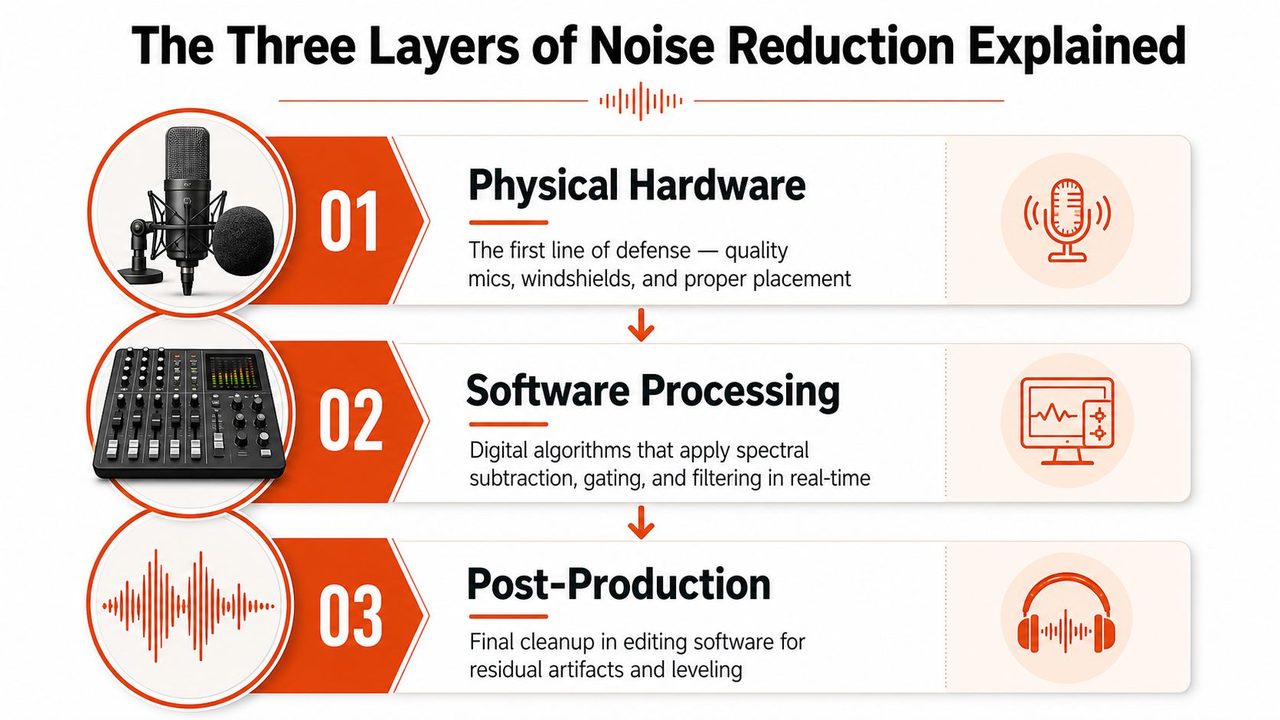
The important shift is to think in layers. The room shapes the raw signal, the microphone decides what gets captured, the OS and app decide how much processing happens, and the model decides how much can be recovered after the fact. A transcript that misses words usually reflects a breakdown somewhere in that chain, not a single bad setting.
The Three Layers of Noise Reduction Explained
Physical hardware does the first cleanup
The microphone and the room act as the first filter in your dictation chain. A microphone close to your mouth captures more speech and less space, so less room noise enters the signal before any software gets involved. A headset boom mic usually performs better than a laptop mic in a noisy room because it stays closer to the voice and farther from the sounds you do not want.
The room shapes the result just as much. Hard surfaces throw sound back into the mic, while soft furnishings absorb some of that energy. A window open to traffic, wind, or street noise folds that sound into the recording at the earliest stage, which leaves less room for later cleanup to recover clean speech.
DSP trims predictable noise
Classical DSP noise reduction works by estimating the noise pattern and then subtracting it or adapting around it. Spectral subtraction listens during quieter moments, builds a noise profile, and removes that profile from the signal. Wiener filtering keeps updating its estimate as the sound changes, so it handles environments that shift over time more gracefully.
The choice matters because each method fits a different kind of problem. Subtraction works best with steady noise, such as an HVAC hum or a constant fan. Adaptive filters are better when the room changes from moment to moment. A technical audio guide from AllPCB makes the same point and also notes that standard audio capture should be at least 44.1 kHz, with 96 kHz recommended for high-fidelity capture before suppression (AllPCB DSP noise cancellation guide).
ML and AI learn speech versus noise
Modern deep-learning systems do more than carve away noise by fixed rules. They learn patterns from data and infer what is likely to be speech, even when the signal is messy. A 2023 Frontiers paper on Statistical Sound Filtering described a fast, domain-free method built on sound texture stationarity and spectral similarity, and reported that participants perceived reduced background noise without significant damage to speech quality. The same Frontiers source also cites a 2023 ASHA study where DNN-based noise reduction produced consistent sound satisfaction across background-noise levels, unlike traditional statistical-model systems, and a 2023 review that reported intelligibility gains of 46 to 58 percentage points for hearing-impaired listeners and 8 to 18 points for normal-hearing listeners across conditions (Frontiers on deep-learning noise reduction).
That is why modern dictation tools usually combine layers instead of betting on one. AIDictation, for example, combines capture choices and model modes rather than treating “noise reduction” like a single toggle.
Key Metrics That Decide Whether Cleanup Helps or Hurts
Decibels tell you how loud the problem is
A recording can sound “quiet enough” to your ear and still be hard for a speech engine to parse. Decibels help you compare the voice and the noise on the same scale. The key point isn't the exact meter reading, it's whether the unwanted sound sits far enough below the target voice to stay out of the way.
For dictation, that means you want enough separation for consonants and word boundaries to survive. If the room noise rides too close to the speech level, software has to guess more aggressively, and aggressive guesses are where mistakes start.
SNR matters more than raw noise
Signal-to-noise ratio is the cleaner way to think about the problem. A room with a loud but steady fan may still be usable if your voice is much stronger than the fan. A room with intermittent voices or clattering keyboard hits can be worse, even if the average level looks lower, because those bursts overlap with the parts of speech the engine needs most.
Speech intelligibility often rises or falls with that balance. Acoustic practice commonly treats 15 to 20 dB SNR as a useful region for clear speech, which is why cleanup tools are designed to improve the ratio rather than mute the entire environment (Svantek background noise guide).
Distortion is the hidden cost
A transcript can degrade even when the audio sounds cleaner. Heavy suppression can clip breaths, soften sibilants, or erase quiet consonants, and those are exactly the features many speech systems use to distinguish similar words. The audio may feel polished, but the model loses texture.
If a denoiser makes the voice sound smoother but the transcript gets sloppier, the setting is too strong.
That trade-off is why you should listen for both readability and artifacting. Clean audio isn't the goal by itself. Accurate text is the goal.
When More Suppression Actually Makes Things Worse
Light cleanup often wins in quiet rooms
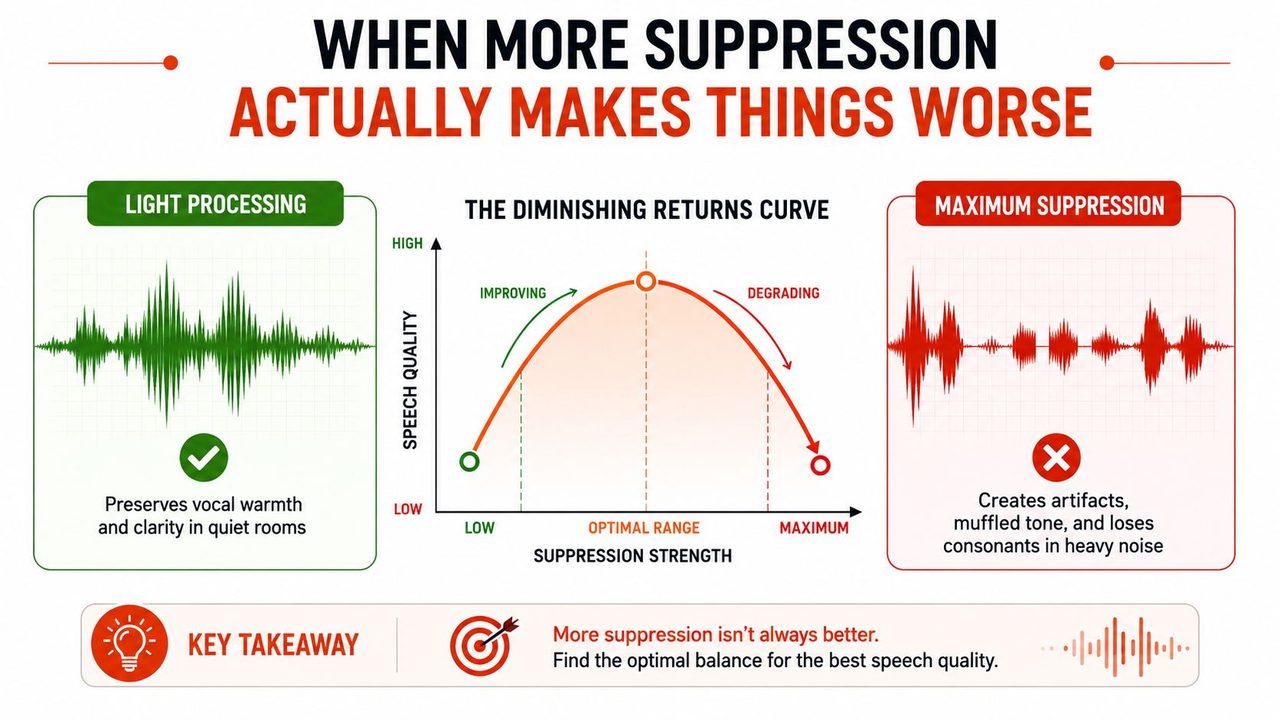
In a quiet room, heavy suppression can do more harm than good. If the original signal is already clean, the software has little noise to remove and a lot of speech detail to risk damaging. That's why a light touch tends to preserve the natural rhythm of your voice and the small cues that transcription engines use to anchor words.
The rule changes once the room gets noisier. A moderate level of suppression can improve the speech-to-noise balance enough to help the transcript. But the gain doesn't rise forever. At some point, each extra step of cleanup starts taking more speech with it.
Intermittent noise is the hard case
Keyboard bursts, side conversations, dogs, dishes, and hallway traffic are harder than constant fan noise because they appear mid-sentence. Steady noise can be modeled and reduced more cleanly. A sudden human voice or a click on a desk can overlap with a consonant and disappear only if the software guesses correctly.
That's why advice that says “just turn noise reduction up” falls apart in practice. The best result usually comes from mic proximity, directional pickup, and moderate software cleanup, not from maximum suppression. Independent audio guidance also warns that gates and denoisers can clip breaths, consonants, and quieter speech if pushed too hard, which makes dialogue less natural and can reduce intelligibility (Editors Keys noise removal guidance).
Heavy AI can still miss the mark
Modern AI cleanup is better than older static filters, especially when the room changes, but it isn't magic. In speech that overlaps with multiple speakers or noisy kitchen sounds, the model has to choose between suppressing the interference and preserving the original voice. If you ask it to suppress everything, it may flatten the speech too.
The useful mental model is a curve, not a switch. Performance rises as cleanup begins, then levels off, then drops once the system starts erasing useful speech detail. That's the failure threshold you're listening for.
Choosing a Microphone and Setting Up Your Mac
Start with the mic, not the menu
A built-in Mac microphone is fine for quick notes in a quiet room. It's not the right tool if the room is active, because the pickup pattern is too close to the laptop and too exposed to the environment. A headset boom mic usually handles dictation better when you need consistency, while a desktop USB mic can work well if the room is controlled and the mic is placed carefully.
If your room has a persistent hum, a resource like buzzing air conditioner help can help you identify whether the sound is mechanical and fixable before you blame the app. That matters because the best noise reduction is often the noise you remove at the source.
Check the Mac settings that actually matter
Open System Settings and confirm the app has microphone permission. Then check input level so the voice isn't too quiet, because low capture level forces later processing to work harder. In Audio MIDI Setup, verify the sample rate if you're routing through an external device, since capture quality affects how much detail survives processing.
If your Mac supports it, use the built-in background sound isolation or similar voice-focused audio options where available. Those features help with consistent ambient noise, but they're still only one part of the chain. They work best after the mic is already placed well.
Positioning does more than most people think
Keep the mic close enough that your voice dominates the room. Aim it slightly off-axis from the noisiest part of the space so the front of the mic hears you first and the noise second. Don't park it directly beside a keyboard or laptop vent.
Useful habit: if you change seats, moving the mic is often more effective than cranking software suppression.
For a focused macOS setup checklist, the internal guide on microphone choice for speech is a practical companion. It pairs well with the guidance above because it treats the mic as a dictation tool, not just an audio accessory.
Tuning AIDictation Modes for Noisy Environments
Match the mode to the room
AIDictation gives you three modes with different jobs. Auto Mode fits the mixed real-world day, when you move between quiet rooms, shared spaces, and calls. Local Mode runs Parakeet v3 on Apple Silicon, so the audio stays on your Mac and still gets strong speech handling. Cloud Mode adds AI cleanup, filler-word removal, and formatting help when the room is messy and the draft needs extra polish.
That choice matters because the noise profile changes what the model has to guess. If the room is only mildly busy, Auto Mode may be enough. If privacy is the priority and the room is still workable, Local Mode keeps everything on device. If the environment is rough and the transcript needs cleanup beyond plain recognition, Cloud Mode gives you more post-processing headroom.
| Choosing the Right AIDictation Mode for Your Noise Level | Best Noise Scenario | Best For |
|---|---|---|
| Auto Mode | Mixed daily use with shifting conditions | General dictation, quick switchovers |
| Local Mode | Private dictation with moderate noise | Offline work, on-device processing |
| Cloud Mode | Tough rooms with messy speech | Cleanup, filler-word removal, formatted drafts |
Use the supporting controls, not just the mode
Microphone selection inside the app matters as much as the mode itself. Pick the input that has the cleanest direct signal, then save custom dictionary entries for names, product terms, and jargon that your voice tends to blur. If your speech changes tone between email, docs, and chat, context rules can adjust formatting so you don't have to retype the same correction over and over.
The broader logic is the same one described in the internal AI audio cleanup guide. Cleanup works best when the source capture is already decent, and the software is polishing, not rescuing, the entire sentence.
Borrow the right habits from adjacent workflows
Game and streaming creators run into the same core issue, voice clarity versus room noise, so a resource like game audio clarity tips can be useful if you want more perspective on mic placement and noise sources. The details differ, but the principle stays the same. Put the voice first, then let software handle the leftovers.
A Repeatable Test for Your Own Setup
Test the same words under different room conditions
Write one short paragraph and dictate it three times, once in a quiet room, once with moderate office noise, and once with heavy fan or AC noise. Keep the text identical so the comparison means something. If your setup changes, only change one thing at a time.
Then listen to the audio and read the transcript side by side. Watch for missed words, odd punctuation, filler-word cleanup that makes the sentence sound unnatural, and any obvious robotic artifacts. A transcript that looks tidy but sounds synthetic is a warning sign, not a win.
Score the result, then keep the best default
Use a simple 1 to 5 scale for intelligibility and artifacts. You don't need a lab to know whether a setting is helping if you compare the same sentence across the same conditions. The point is to find the mode that gives you the best balance, not the most aggressive cleanup.
- Prepare the script: use one standard paragraph every time.
- Record three takes: quiet, moderate noise, and heavy noise.
- Apply your settings: test the current noise reduction level on each take.
- Score the results: rate readability and artifact presence.
If accuracy drops, move the mic closer before you increase suppression. That order saves more transcripts than endlessly tuning software.
Putting It All Together for Cleaner Dictation
Cleaner dictation usually comes from the chain working in order, room first, mic second, Mac settings third, model mode fourth, dictionary fifth. A weak link forces the later stages to guess, and guessing is where transcripts start to drift. Positioning often has a greater impact than users realize, because a small move can change how much unwanted sound reaches the mic before software has to sort it out.
The room sets the ceiling for what the software can recover. For physical treatment ideas, the guide on soundproofing insulation South Florida explains how reducing noise at the source changes the whole capture chain before any algorithm touches the signal. That matters because speech-to-text systems work more like a careful listener than a miracle worker, they do better when the voice is already clear and steady.
On the Mac side, the input path matters just as much. A good place to compare the workflow is how to use speech to text on Mac, since it shows where the operating system hands off audio and where dictation settings start to matter. If the input level is too low, the model has to guess at consonants. If suppression is too aggressive, it can shave off the same details you want preserved.
Start with the simplest fix you can test in ten minutes. Move the mic closer, check the input level, and run the same paragraph through your current mode before changing anything else. That order gives you a clean read on whether the room, the mic, or the software is the actual bottleneck.
AIDictation gives you the pieces that matter for dictation on a Mac, including Auto Mode, Local Mode, Cloud Mode, custom dictionaries, and context-aware formatting. If you want to see how those pieces fit into a real workflow, try AIDictation in your own workspace and compare the transcript before and after each change.
Frequently Asked Questions
What does Background Noise Reduction for Cleaner Dictation on Mac cover?
You know the moment. You start dictating a long email on your Mac in a café, on a train, or beside an open window, and the transcript looks fine at first glance, then every few words a sentence bends sideways.
Who should read Background Noise Reduction for Cleaner Dictation on Mac?
Background Noise Reduction for Cleaner Dictation on Mac is most useful for readers who want clear, practical guidance and a faster path to the main takeaways without guessing what matters most.
What are the main takeaways from Background Noise Reduction for Cleaner Dictation on Mac?
Key topics include Table of Contents, Why Background Noise Reduction Matters for Dictation, The Three Layers of Noise Reduction Explained.
Ready to try AI Dictation?
Experience fast voice-to-text on your device. Free to download.
Download FreeRelated Posts
Transcription Audio to Text: A Practical Workflow Guide
Learn transcription audio to text with a clean workflow covering tools, recording, cleanup, and accuracy tips that work on macOS and beyond.
Voice to Text on Mac: Built-in Dictation vs the Best Apps (2026)
How to use voice to text on a Mac or MacBook: turn on built-in dictation, see where it falls short, and compare the best Mac voice to text apps for 2026.
Voice Typer for Mac Guide to Smarter Dictation
Explore voice typer for Mac options, compare built-in and AI tools, improve accuracy and privacy, and choose the right dictation workflow.