Master Accessibility Shortcut iPhone: Tips & Tricks for 2026
You're usually not looking for an accessibility feature when you have time to spare. You need it in the middle of something. You're trying to dictate a note before a meeting starts, zoom in on a serial number under bad lighting, or switch on Voice Control when your hands are full. That's when digging through Settings feels absurd.
The iPhone has a better path. Apple hides a lot of capability behind the Accessibility Shortcut, and for anyone who treats the phone like a serious work device, it's one of the most useful built-in launchers on iOS. It is often associated with accessibility in the narrow sense. In practice, it's also a fast utility switchboard for voice input, reading, one-handed use, and task-specific workflows.
Table of Contents
- Unlock Your iPhone's Hidden Shortcut Instantly
- How to Activate and Customize Your Shortcut
- Real-World Scenarios for Popular Shortcuts
- Power-User Workflows and Advanced Tricks
- Troubleshooting Common Accessibility Shortcut Problems
- Expanding Your Reach with Back Tap and the Action Button
Unlock Your iPhone's Hidden Shortcut Instantly
The Accessibility Shortcut is Apple's built-in quick launcher for accessibility features. On Face ID iPhones, you trigger it by triple-clicking the Side button. On older models, you triple-click the Home button. Apple also notes that if you select only one feature, it toggles on or off immediately, and supported models can also use the Action button, Back Tap, Control Center, Siri, or Vocal Shortcuts as alternate ways to activate accessibility features, as described in Apple's Accessibility Shortcut guide.
That sounds small until you use it under pressure. Instead of opening Settings, scrolling to Accessibility, finding the right submenu, and then toggling one option, you compress the whole action into a single physical gesture. For mobile work, that matters.
Why professionals should care
A lot of “accessibility” features solve ordinary workflow problems:
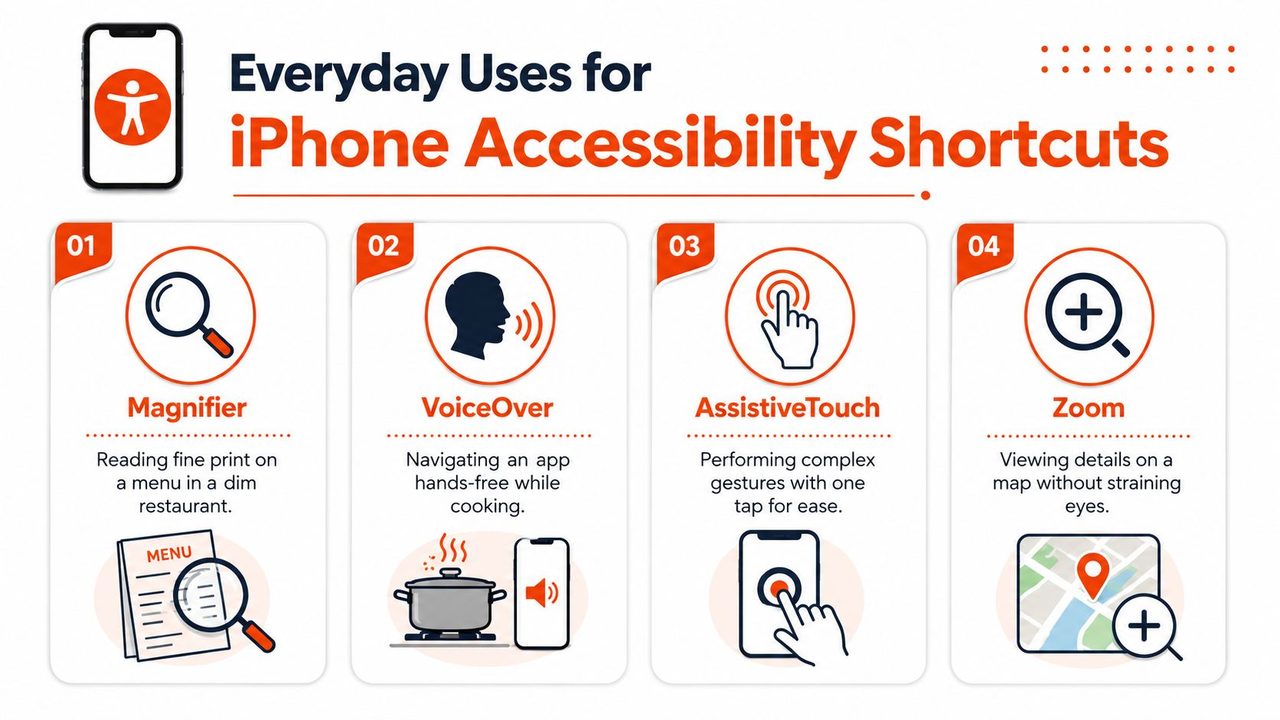
- Voice Control can turn the iPhone into a hands-free input device when you're cooking, commuting, or carrying gear.
- Magnifier is useful far beyond low vision. It helps with labels, ports, receipts, badges, and hardware details.
- AssistiveTouch can reduce awkward hand movement when you're using a large phone one-handed.
- VoiceOver and display tools are useful for testing interfaces, checking app behavior, and reviewing content from a different interaction model.
If you work in product, support, design, or development, the Accessibility Shortcut is less about accommodation alone and more about friction removal.
Practical rule: Put functions behind the shortcut only if you need them faster than you can reach them through Settings.
There's another reason this feature gets overlooked. Apple presents it as an accessibility control, which is accurate, but that framing causes power users to skip it. They shouldn't. If you already rely on speech input, the broader context around voice-to-text accessibility tools makes this shortcut feel less like a niche setting and more like a system-level speed key.
Its value isn't novelty. It's that your iPhone can shift modes on command.
How to Activate and Customize Your Shortcut
A common initial reaction is to stop at “it works.” The better approach is to configure it so it works reliably and predictably.
Set it up once
Apple's setup path is straightforward. On iPhone, go to Settings > Accessibility > Accessibility Shortcut and choose the features you want available through the shortcut. Then trigger it by triple-clicking the Side, Top, or Home button depending on your model, as shown in Apple's setup instructions.
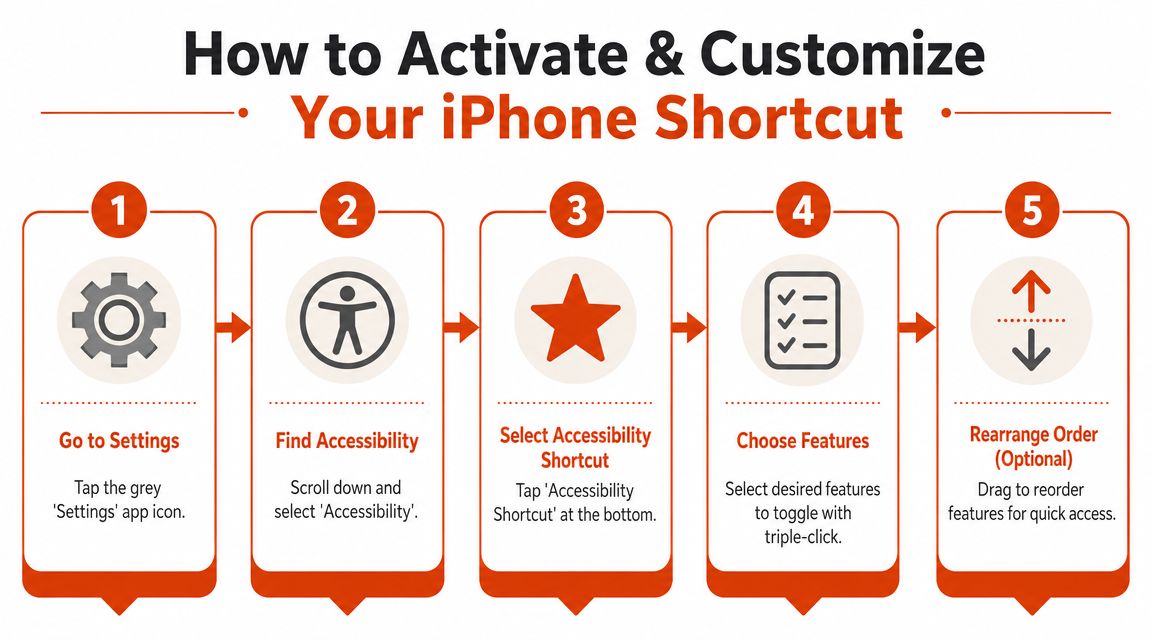
A clean setup looks like this:
- Open Settings.
- Tap Accessibility.
- Scroll to Accessibility Shortcut.
- Select the features you use.
- Test the trigger immediately.
A lot of users skip that last step. Don't. If the triple-click feels inconsistent the first time, it won't suddenly become dependable later.
For a related tablet workflow, the same thinking carries over to dictation on the iPad, where quick access matters just as much as recognition quality.
Choose fewer features than you think
The accessibility shortcut iPhone menu gets slower as you stuff it with options. If you pick one feature, the phone toggles it immediately. That's the fastest possible behavior. If you pick several, iPhone shows a chooser.
That trade-off is worth thinking about:
| Setup style | What happens | Best for |
|---|---|---|
| Single feature | Instant toggle | One daily action like Magnifier or Voice Control |
| Small menu | Quick chooser | Two or three tools you use in different contexts |
| Long menu | More taps and more ambiguity | Rarely ideal |
For most professionals, a short list wins. I'd rather have two options I can identify instantly than six I have to read every time.
Here's a practical way to decide:
- Keep daily tools in if you reach for them without thinking.
- Remove “just in case” items that sounded useful but never get triggered.
- Separate utility from testing if you use some features for QA and others for real-world work.
This is one of those settings where restraint improves speed.
A quick visual walkthrough helps if you want to see the taps in sequence:
Make the click timing fit you
Apple also lets you adjust the double-click or triple-click speed under Settings > Accessibility > Side Button or Home Button. That setting holds greater importance than typically recognized. If your click rhythm doesn't match the configured threshold, the shortcut can fail even though it's enabled.
If triple-clicking feels flaky, don't assume the feature is broken. Assume the timing is wrong first.
This matters for users with different motor patterns, but it also matters when you're moving fast. If you trigger the shortcut while walking, carrying something, or using a case with stiff buttons, your timing changes. Slowing the click speed often fixes “random” failures.
The best customization is the one you stop noticing because it works every time.
Real-World Scenarios for Popular Shortcuts
Features make sense when they solve a problem in the moment. The iPhone's accessibility tools are full of those moments.
When speed matters more than elegance
You're at a conference registration desk and the Wi-Fi code is printed in tiny text under glossy plastic. Magnifier through the shortcut is faster than opening Camera, pinching, and hoping autofocus cooperates.
You're standing on a train, one hand occupied, trying to reach controls at the top of a large-screen iPhone. AssistiveTouch gives you an easier interaction layer without changing your whole setup.
You hand your phone to a child for a video or to a patient for a form. Guided Access is the difference between “use this app” and “accidentally open everything else.”
You're testing a screen design or reviewing content contrast late in a work session. Display-related accessibility options let you inspect usability from a different angle without digging through multiple menus.
Fast access changes whether a feature gets used at all. Tools buried in Settings tend to become theoretical.
Useful combinations for everyday work
Some combinations work especially well:
- Magnifier plus AssistiveTouch works for field service, inventory checks, and hardware setup where you need visibility and easier touch input.
- VoiceOver plus app testing helps product teams hear what interface elements communicate when visual assumptions are removed.
- Zoom plus maps or diagrams is useful when reviewing floor plans, screenshots, or technical imagery on a phone-sized screen.
- Voice Control in kitchen, lab, or workshop settings gives you hands-free interaction when touching the screen isn't practical.
For neurodivergent users, quick access can also reduce transition friction. The broader conversation around understanding technology's role in autism therapy is useful here because it shows how device-based tools can support routines, communication, and environmental adaptation. The same principle applies on iPhone. A shortcut isn't just convenience. It can be a predictable control surface.
A common mistake is choosing features based on what sounds advanced. Choose based on what interrupts you most often. If glare, fine print, and one-handed use keep slowing you down, optimize for those first.
Power-User Workflows and Advanced Tricks
The Accessibility Shortcut becomes more interesting when you stop treating it as a toggle and start treating it as a mode switch.
Turn Voice Control into a fast capture tool
For professionals, Voice Control is one of the strongest candidates for shortcut placement. Not because it replaces every other input method, but because it lets you enter a hands-free state immediately.
That matters in a few specific situations:
- Drafting notes between meetings when typing is slower than speaking.
- Capturing ideas while walking when you don't want to stare at the screen.
- Working with gloves, tools, or equipment where touch input is awkward.
- Reviewing and navigating apps by voice during testing or accessibility checks.
If you use your iPhone as a mobile intake device for thoughts, reminders, task fragments, or rough paragraphs, the shortcut can act like an “input stance” toggle. Triple-click. Speak. Exit. Move on.
Use the shortcut as a mode switch
A smart setup treats each feature as a context change.
Work mode might mean Voice Control.
Inspection mode might mean Magnifier.
Reduced reach mode might mean AssistiveTouch.
This is why I usually recommend against loading the menu with too many options. A mode switch should be obvious. If you have to think about it, the setup isn't done.
A few practical patterns work well:
- Single-purpose setup: Assign one feature if your need is repetitive and frequent.
- Dual-purpose setup: Use two options if your day alternates between voice input and visual inspection.
- Testing setup: Keep a separate configuration when you're doing QA on app accessibility behavior.
If your workflow extends to desktop writing, one option on the Mac side is AIDictation, which turns speech into formatted text on macOS with local and cloud recognition modes. That's not an iPhone shortcut replacement. It fits the other half of the workflow, where quick mobile capture often turns into longer desktop drafting.
The best accessibility shortcut iPhone setup often looks boring. It does one job quickly, so you keep using it.
Know the privacy trade-off
Voice-driven workflows always raise one practical question. Where does the processing happen?
Some features emphasize local interaction. Others may involve broader system services. The right choice depends on your environment. If you're handling sensitive work, that should affect which voice tools you rely on and when you use them. A clinician, lawyer, or product manager discussing confidential roadmap details shouldn't treat all speech systems as interchangeable.
The same logic applies to automation. Fast access is useful, but not every context should default to spoken commands. In a shared office, a train, or a waiting room, the “best” workflow on paper may be the wrong one socially or privately.
Power use isn't about stacking every shortcut iOS offers. It's about choosing triggers that fit the task, the place, and the stakes.
Troubleshooting Common Accessibility Shortcut Problems
When the shortcut fails, it usually fails in predictable ways. The fix is often simpler than the symptom makes it look.
The triple-click does nothing
Start with the obvious path: check whether a feature is assigned under Accessibility Shortcut. If nothing is selected, there's nothing to launch.
Then test the button itself. Thick cases, worn buttons, or awkward grip can make a triple-click unreliable. If the phone recognizes single presses but not triple-clicks consistently, the issue is often timing.
Try this:
- Slow the click speed: In Settings > Accessibility > Side Button or Home Button, adjust the click speed so your natural cadence is accepted.
- Test while stationary: Don't diagnose this while walking or reaching. Stand still and click deliberately.
- Remove the case temporarily: Some rigid cases make fast button presses harder than users realize.
The wrong feature opens
This usually means you selected multiple options and now the menu adds friction, or the one you want isn't easy to spot quickly.
Use a smaller set. If a feature only gets used once in a while, it probably doesn't belong in your primary shortcut menu.
A cleaner decision model helps:
| Symptom | Likely cause | Better setup |
|---|---|---|
| Too many taps | Too many assigned features | Trim to one or two |
| Wrong tool selected | Similar-looking menu choices | Keep only frequently used items |
| Need speed, not choice | Menu appears every time | Use a single assigned feature |
You enabled something and now the phone feels stuck
This is common with features like VoiceOver or Zoom if you turned them on accidentally and aren't familiar with their gestures.
The fastest response is usually to trigger the Accessibility Shortcut again and turn that feature back off. If your setup includes a single feature, the same triple-click often reverses it immediately.
Don't panic and restart first. Try the same trigger that enabled the feature.
If the interface behavior changed dramatically, slow down and use hardware buttons rather than guessing at gestures. Restarting can help in some situations, but it's usually not the first move. The first move is to toggle the shortcut again.
A final practical point: if other people use your phone, keep the shortcut simple. Shared devices become confusing fast when one triple-click opens a menu full of unfamiliar tools.
Expanding Your Reach with Back Tap and the Action Button
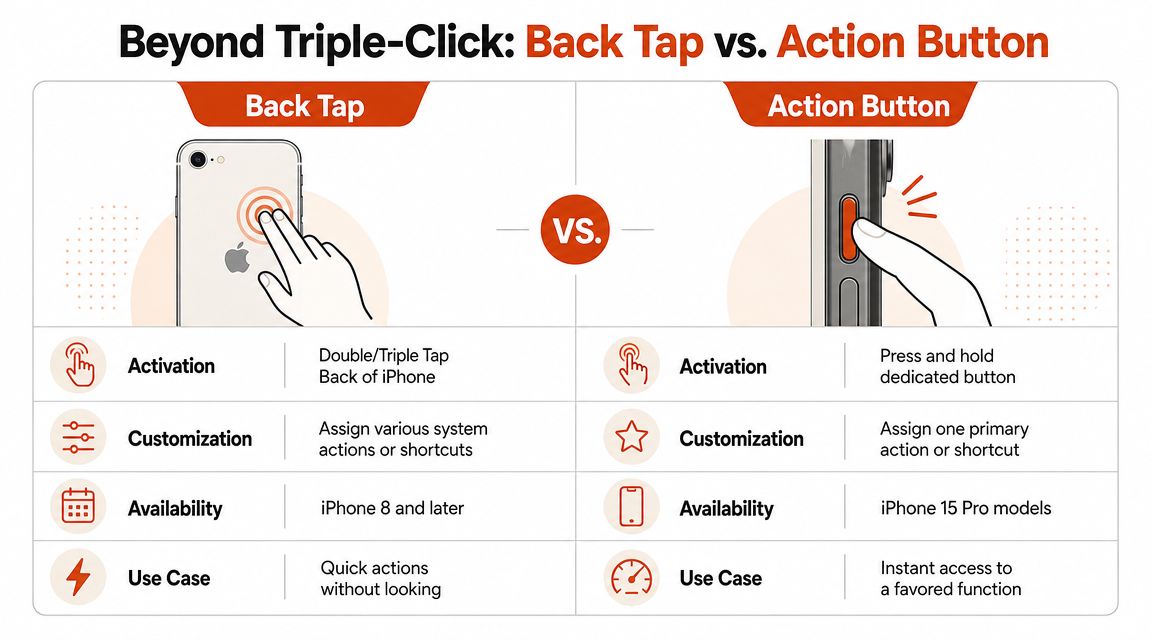
Triple-click is reliable, but it isn't always the best trigger. Apple also supports other activation paths for accessibility features on supported devices, and two of the most useful are Back Tap and the Action button.
Which trigger fits which job
Back Tap is good when you want something discreet and fast. Tapping the back of the phone can feel more natural than squeezing a side button repeatedly, especially when the phone is already in your hand.
Action button works better when one function matters more than all others. If you depend on one critical accessibility feature every day, dedicating a physical button to it removes ambiguity.
A simple comparison:
- Use triple-click when you want a dependable built-in launcher with broad compatibility.
- Use Back Tap when you want a low-visibility gesture that doesn't require looking at the device.
- Use the Action button when a single function deserves first-class hardware access.
This matters beyond convenience. Spatial and mobility tools are increasingly tied to hardware capabilities, and resources on LiDAR for accessible indoor mapping show how phone sensors can support navigation and accessibility in more advanced ways. The same mindset applies here. Hardware placement changes usability.
If your workflow already includes spoken notes, recordings, or interviews, pairing fast-access triggers with a process for transcribing voice memos on iPhone is a sensible next step.
If you capture ideas on iPhone and turn them into finished writing on Mac, AIDictation is worth a look. It converts speech into cleaned-up text on macOS, with local and cloud modes for different privacy and formatting needs.
Frequently Asked Questions
What does Master Accessibility Shortcut iPhone: Tips & Tricks for 2026 cover?
You're usually not looking for an accessibility feature when you have time to spare. You need it in the middle of something.
Who should read Master Accessibility Shortcut iPhone: Tips & Tricks for 2026?
Master Accessibility Shortcut iPhone: Tips & Tricks for 2026 is most useful for readers who want clear, practical guidance and a faster path to the main takeaways without guessing what matters most.
What are the main takeaways from Master Accessibility Shortcut iPhone: Tips & Tricks for 2026?
Key topics include Table of Contents, Unlock Your iPhone's Hidden Shortcut Instantly, Why professionals should care.
Ready to try AI Dictation?
Experience fast voice-to-text on your device. Free to download.
Download FreeRelated Posts
Text to Speech on Android: Built-In Tools, Apps & AI Voices (2026)
How to use text to speech on Android: Google's built-in Select to Speak, the best free and paid TTS apps, AI voices, and how to fine-tune speed and voices.
Text to Speech on iPhone & iPad: Built-In Tools & AI Voices (2026)
How to use text to speech on iPhone and iPad with built-in Spoken Content, the best third-party apps, and AI voices. Make your iPhone read anything aloud.
Best AI Apps for iPhone: Top Picks for 2026
Discover the top 10 AI apps for iPhone in 2026. Our curated list covers productivity, writing, and editing tools to help you choose.